Its not so long ago, just a few weeks in fact, that I broke my arm racing at the Welsh Gravity Enduro Series. While the healing process has been quick enough, and relatively painless all things considered, it’s still fairly weak, and the range of movement I have right now is somewhat limited.

Me, broken.
To help me get back on the bike, I decided to build up myself an AM to keep in the van, ready to snatch a ride whenever the opportunity occurs. For this type of endeavour the hard tail is the weapon of choice, ride-rinse-ignore-repeat. It just has a certain bombproof-ness that suits a winter ride that a full suss will never match. While this probably doesn’t sound so unusual to most people, you might be surprised to hear I don’t personally own a bike right now. At least not a whole bike, and certainly not one that is readily available. I split my time between Bird HQ and the far north east of England where I live, and I really only ride whatever happens to be available from the demo fleet, or any prototypes that are lying around. For the last 3+ years since Bird started I’ve never actually owned a bike, 100% complete, that I could call my own.
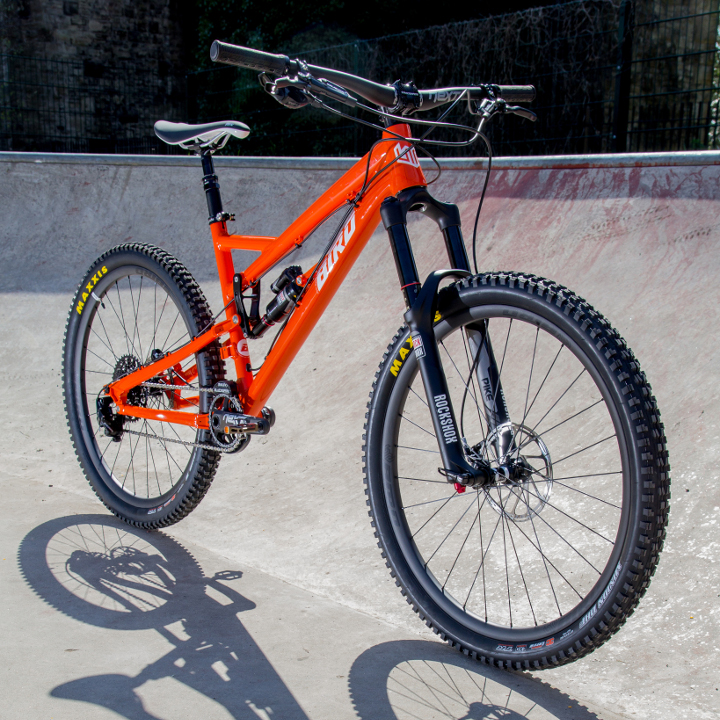
The Mean Green Machine
Deciding to correct this anomaly in my life, I set about building the mean green machine. Its based around a standard spec AM with a few tweaks to make it my own, and I thought I would share it with you.
I decided to go with a medium, an unusual choice given my penchant for longer bikes, but the limited range of movement on my arm, combined with wanting something for quick blasts when I could meant a medium suited me better right now. Size is an interesting thing, we often get asked “what size should I buy?” and while we try and offer the best advice we can, it is ultimately a personal preference. I can easily ride a large AM as well as I can a medium, but on this day, a medium was just the better choice for what I wanted.
I decided that this build would be stealth black and green, mainly because I had some green hubs that I’d had made for me knocking about, but also because the stealth black is a bit of a labour of love for me, having spent a long while getting just the finish I wanted from the paint-shop, so it seems only right I went with that.

The Mean Green Machine
The Specification
Everything starts with the specification when we build a bike for a customer, and for me it was just the same. I decided to go pretty high end on this one, throwing caution into the wind and instead making the very best AM I could from the parts I had available.
- Bird Zero AM – Size M, Stealth Black
- RockShox Lyrik RCT3 160* SA, Stealth Black
- SRAM Eagle X01 drivetrain
- SRAM Eagle X01 Carbon cranks, 34T
- Hope Stainless BB w/GXP conversion
- SRAM Guide RS Brakes
- SRAM Centerline 200/180 rotors
- RaceFace Turbine R 35 Stem, 40mm
- RaceFace Next SL 35 bars, 760mm, green
- RaceFace Half Nelson grips, grey
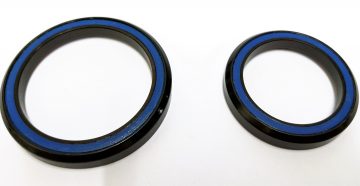
- Cane Creek 40 headset
- RockShox Reverb Stealth 170mm, left hand under bar
- Fabric Scoop Race Saddle, Ti rails
- One Up Bash Guard
- RaceFace Chester composite pedals, green
- Prototype carbon rims, 32mm internal
- Custom made hubs, 142/12 & 100/15mm, 28h, XD driver, green
- DT Swiss Competition spokes w/Pro Lock Squorx brass nipples
- Maxxis Shorty 2.5WT Exo TR Maxx Terra up front
- Maxxis DHR2 2.3 Exo TR Maxx Terra out back
- RockShox Maxle Ultimate, 142/12
* The Lyriks are currently 160mm, but unlikely to stay that way. I will probably chop out the air shaft for a 150 or maybe even 140mm air shaft, but I figured I would try a 160mm hard tail out to see how it goes before doing that. Testing whenever we can is part of our ethos in order to find out what works and doesn’t. I should point out that running a 160mm fork on your AM will invalidate it’s warranty!
The Build
First thing to do was make some wheels. If you ever fancy building your own wheels, I can strongly recommend you build them with carbon rims. Building carbon wheels is ludicrously easy compared to aluminium rims. The stiffness of the rims means its very easy to get them straight and round with minimal effort. Whereas an alu rim will deflect and go egg shaped relatively easily with moderate variations in spoke tension, a carbon rim defiantly wants to stay true and round unless you really mess it up.
The rims I used are some new 32mm internal rims from one of our manufacturers. I’d specced them up with an ‘enduro-proof’ layup, blending strength where its needed with some weight saving where its not, to give a stiff, strong rim that was not too heavy. We’ve broken enough rims here at Bird to know what needs to go where, or at least I think we do. They could be lighter, but I wanted them to last. Paired with 28 DT Swiss Competition spokes per rim, they are a cost effective, mid weight option, perfect for this build. Brass double head DT squorx pro-lock nipples finish off the build. These nipples are perfect for carbon rim builds, and I had the rims custom drilled to ensure that not only were the nipple angles exactly as I wanted them for my hubs, but that building from the back, as is the best way, was a cinch. Thanks to Dan for doing me some nice technical drawings just for the hole drilling! It’s all about the details…
The hubs are made by a small machine shop in Taiwan, that specialises in high end hubs.

Sometimes to get what you want you need to go the extra mile.
They are based on a standard DH offering the hub co. makes, but I had them machined out to save weight while keeping the nice big bearings, and adjusted for a 12 and 15mm axle 🙂 I would normally go straight to Hope for my hubs, but they won’t supply me green ones, and I wanted green, so custom it was. These come in around 30g lighter after all the extra machining than a pair of Hope Pro 4s too, which is a bonus. The quality of the manufacture is excellent, and the sealing is first rate, so I have high hopes for these. My one gripe is that while I asked to trim the flange width a little to save weight, I should have done my homework a bit better, as the DH-spec flanges on these hubs are still very fat, and that means the spokes don’t sit perfectly in the holes, as the J Bend is a little too abrupt to work its way round the flange thickness, but thats a small complaint I guess. Next time I will fix that up.
Weight-wise the wheels run at just over 1750g for the pair. Not the lightest wheels I will ever build up, but they certainly feel like one of the stiffest I’ve ever built, and they should last forever!
Assembly
Wheels built, the rest of the bike is of course a breeze. We build alot of bikes here at Bird, everyone built by us to order, so assembly is pretty much a doddle. There’s a few steps you probably don’t realise we do though, before a Bird gets assembled, including:
- We tap every BB shell again, no matter how good it looks, to ensure that its clean and ready to have the BB fitted.
- We tap the ISG05 tabs, and the maxle threads
- We check the seat-tube ream
- We check the facing on the head-tube and BB to ensure its perfect
- We inspect the paintwork end-to-end to ensure its chip and mark free
- We check the alignment of the bike to ensure it is straight, and the brake mounts are straight too
You’d be surprised what you’ll find on many bikes if you look closely. In my lifetime I’ve seen some real doozies from big manufacturers, leaving me scratching my head wondering “how on earth does this stuff pass QC?”, here at Bird, even our personal bikes get proper quality control before they leave the workshop, and yours more so (I must admit not checking the paintwork on my own bike 🙂 ).
Parts Highlights
The highlight of this build for me has to be the Xo1 Eagle. SRAM’s new 12 speed groupset. Its a joy to use and offers a massive 500% range from a single shifter. It really is a game changer. The shifting is so precise its crazy, and the adjustment you get from the shifter brake combo is huge too, allowing you to easily set up the shifter just right for you. With 2 horizontal positions, about 45 degrees of fore-aft rotation, and an adjustable downshift lever, the SRAM set up on X01 is about as good as it gets. The shifting is incredible, so quick and smooth its like its not happening, and the 12 speed cassette weighs very little for its size. OK so its expensive, but when you see the detail thats gone into it, you start to understand why.

160 party up front, all serious out back. The X01 Eagle drivetrain provides some real XC capability.

The machining on the X01 (And XX1) cassettes is mentally intricate.
One thing you probably don’t know is that Eagle cassettes run narrow-wide rings on the biggest two cassette cogs. This is to eliminate the dropped chains from back / slack pedalling as far as I know and have experienced, and it works. Oddly, although it probably shouldn’t you never experience a mis-match between chain and cog either. The chain finds it’s paired thick-thin quite happily with every shift.
Drivetrain selected, the rest of the parts are an easy choice, balancing weight and strength at every opportunity. I decided to go big on the rotors as the Guide RS brakes offer excellent modulation even on the biggest rotors, and went in for the 170mm reverb as well, something with my stumpy legs I can’t normally quite manage, but given this is a medium AM I could just squeeze it in.
A first for me was composite flat pedals. I used to be 100% clipped in, but overtime I have begun to appreciate the benefits of flat pedals paired with good shoes. This time of year I am running FiveTen Freerider Elements, a shoe I can’t say anything bad about, other than there’s no black & green version. Paired with the Chester composite pedals its a great combo. The Chester is light and had a good size platform, and runs a screw in pin and nut system, which is great as it means that you can loose a pin through smashing it out and still pop a new one back in no hassles. The Chester isn’t the grippiest pedal I’ve ever run, but to be fair, I find the grippiest ones a bit weird to ride on, offering so much grip that you struggle to adjust your foot position when you’ve got it somehow in an awkward position. I actually prefer the ‘medium’ grip of the Chester I think.

Plastic Fantastic. Composite (Posh word for plastic) pedals are becoming increasingly common on the trails, and for good reason.
Other parts of note might include the One-Up Components Bash guide. Again an often asked question is “Do I need a chainguide?” The answer is both yes and no. No, because chain drops are a rarity nowadays with the various thick-thin chainrings we supply, but yes, because even that is not 100% reliable, especially as the ring wears, but more important is the ‘bash’ part. The chainring on those X01 cranks is expensive. Very expensive. It runs at £87 RRP. That’s not a typo. OK, so if you run X01 Eagle you’re likely aware of its running cost, and thats not an issue for you I guess, but chainrings, especially on low-BB bikes like ours are exposed to all kinds of nasty rock and log strikes that will turn your lovely chainring into a pringle in a heartbeat. The investment in a bash guard, with the added bonus of a silent, friction free top guide to go with it is a very sensible one. It weighs next to nothing, never wears out and might save you a fortune in chainrings.

An expensive chainring protected by an inexpensive bash guide.
Other little tweaks just for me include using a second clamp for the right brake. Maybe I have short thumbs, maybe I am weird, but I prefer splitting up my Reverb remote from the brake in order it can be closer to the grips. It’s just a nicer position for me to use, meaning everything is where it should be, although the aesthetic purists will of course hate it 😉

Bucking the trend with a second clamp for the Reverb/Brake combo
Up front its a RaceFace triple whammy with a Turbine R 35 stem in 40mm, Next SL 25 bars in 760mm width, and Half Nelson grips. Is this the perfect set up? Maybe? The Turbine R is probably not a stem you’ve heard of, I think its OE only, but its actually an Easton Haven stem with RaceFace logos. The Easton Haven is probably the nicest stem thats come out from any manufacturer in modern times, made only better by putting RaceFace logos on it (RaceFace bought Easton a few years back so its no surprise they’ve begun to migrate Easton’s MTB range over to RaceFace and leave Easton to focus on the road side). I’ve plumped for a 40mm here, as the medium AM would be a touch short for me if I went smaller, but we do now stock the strap-the-bar-to-the-steerer 32mm length too. A dinky stem indeed and fitting for our long reach short stem philosophy. If I could change anything I would add maybe 15mm to the Next SL bars, as 760mm is a touch narrower than I am used to, having ridden Sixc and Atlas so extensively over the last couple of years, but its still a good size, and I will happily trade the extra length I could get from a Sixc bar for the feel and weight saving to be had from a Next SL on this bike.

Can different logos make a product better? Yes they can.
The First Ride
I won’t bore you with telling you how awesome this AM is. If you’re reading this then you probably know one of two things:
- You own an AM and you know its awesome
- You know I am a founder of Bird and so unlikely to say anything bad 🙂
Either way, extolling the virtues of my new bike is probably pointless, so instead, I will tell you how I feel about it. Its so nice having a bike thats genuinely mine again, I can’t really say. Its a labour of love, built over about 6 months when you take into account the hubs and rims, which I am 100% happy with the outcome. This bike will provide me smiles for miles I am sure, and thats the way it should be. Whether you buy a stock bike, custom build or do something between the two, there’s always a Bird that will put a smile on your face and remind you why you ride.
Ben.

First ride day is special no matter how many bikes you build.