RockShox have made a fantastic guide to understanding suspension and how it works… we thought we’d share it with you rather than you having to search for it!
Category: Tech Talk
Rear Suspension Design and Aeris Kinematics
Ever wondered what makes the rear suspension on the Aeris so great? Bird’s in house Mechanical Engineer, Dan Hodge gives his views on suspension design and how the Aeris came about. Read on to find out more…
When developing the suspension kinematics for the Aeris, I had a few key characteristics in mind:
The bike had to pedal fantastically; even when stomping on the pedals when stood up out of the saddle I didn’t want any pedal bob from the back end. I didn’t want to rely on compression damping to achieve this either, which would kill the activity and grip from the back end. This means that I needed lots of Anti-Squat (Anti Squat is the resistance of the rear suspension to compress under forwards acceleration) built into the frame.
The shock curve had to be supportive throughout the stroke, without any nasty falling rates at the end of the stroke (previous testing and analysis on the trails had already highlighted this as something to avoid).
The leverage ratio (this is the ratio between how much the wheel moves to how much the shock moves) on the shock had to be low – this meant long stroke shocks. I wanted it low so the damper doesn’t have to work as hard in order to control the back wheel – this also means that shock and pivot forces are kept to a minimum, which is a good thing for bearing and bushing life. For reference, the shock curve (or shock rate to be more precise) and leverage ratio are inversely proportional to each other: Shock rate = 1/Leverage ratio, and Leverage ratio = 1/shock rate.
The first thing that I did before designing the Aeris was to write my own kinematics package in Microsoft Excel. Why not use an off the shelf kinematics package? Because when you code the maths, you understand the maths. I felt that understanding the mathematics behind anti-squat and shock curves was the key to developing great suspension. Writing in Excel also allowed me to actively link the 3D CAD model with the kinematics model. So when the 3D model changes, the kinematics model automatically updates and generates the new kinematics curves for my review, instantly. From start to finish the Excel kinematics project too me 3 months to develop and implement.
Once I had fully grasped mountain bike rear suspension design myself, it made me realize how much misinformation there is out there on the internet. I don’t claim to have invented a new suspension platform, or to have designed the most efficient system on the planet either – design is all about choices and compromises, no suspension system is perfect. It’s about deciding what you want to achieve and what you are and are not prepared to compromise on in order to achieve your goals.
One thing that’s worth mentioning is “axle path”. This is the path that the rear axle takes during the compression of the rear suspension. You may have noticed that I haven’t mentioned axle path at all so far; this is because it’s irrelevant.
Yes, that’s right – I said that axle path is irrelevant. When choosing how you want your rear suspension to behave, axle path isn’t something that you aim for. You decide how much anti-squat that you want, and you decide what shape shock curves you want to aim for, and the axle path is a resultant of those factors. In a perfect world you would try to control the axle path so that the rear wheel moves in a straight line parallel to the front (in order to maintain a constant wheelbase during full compression), but without using idler wheels to run the chain over this would result in enormous amounts of anti-squat and chain growth, which would make the bike ride terribly. So in the world of “normal” bike design, axle path is irrelevant.
When you see a bike company presenting a graph plotting axle path, ask yourself this: What are they trying to tell me? Is this axle path good or bad? Is it better than the other axle path on X’s bike? The truth is that it’s meaningless; What does mean something is how much anti-squat is present in the rear suspension. Give an average rider two bikes, both with fully open (i.e. pedal platform disengaged) rear shocks, but one bike with low (say 0-20% when sagged) anti-squat, and one bike with high (say 90-110%) anti-squat, and ask them to pedal as hard as they can. I’ll bet that most riders would be able to tell the difference instantly – the low anti-squat bike will be bobbing all over the place during acceleration (and consequently wasting precious rider effort), whereas the high anti-squat bike will feel more like a hardtail under power. Shock curves are a little bit harder for the average rider to differentiate, but a poor shock curve will usually be detected by peculiar behaviour when riding – sudden unexpected bottom-outs or spikes through g-outs and jumping.
Now onto the Aeris rear suspension:
Shock curve
Shock curves are a curve. Some may appear to be straight, but unless you have a very clever linkage then they are never perfect straight lines. Curves have a minimum and a maximum point; these can be at the beginning, middle or end of the stroke. A curve that starts low and steadily increases is a progressive shock curve – the effective spring and damping rate increases from the start to the end of the stroke. Some progression at the end of the stroke is normally desirable to prevent the suspension from bottoming out. A curve that starts high and ends low is a regressive shock curve – the suspension is relatively easier to compress at the end of the stroke compared to the start. There are some situations where this can be useful, but generally this is something to avoid. Then you have regressive-progressive curves, and progressive-regressive curves. Regressive-progressive means that the suspension starts firm, then gets soft, then firms up again. Progressive-regressive is the opposite – it starts soft, then firms up, then gets soft again.
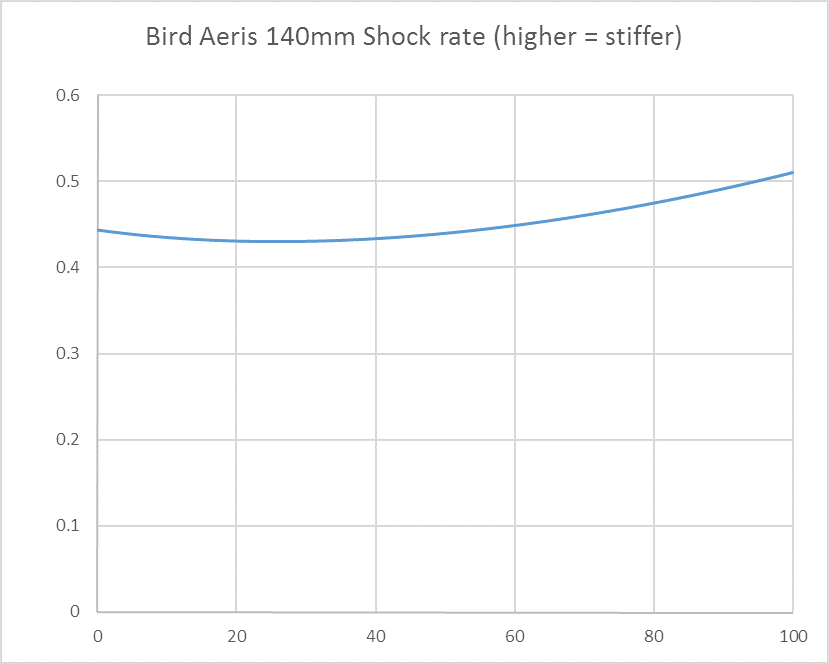
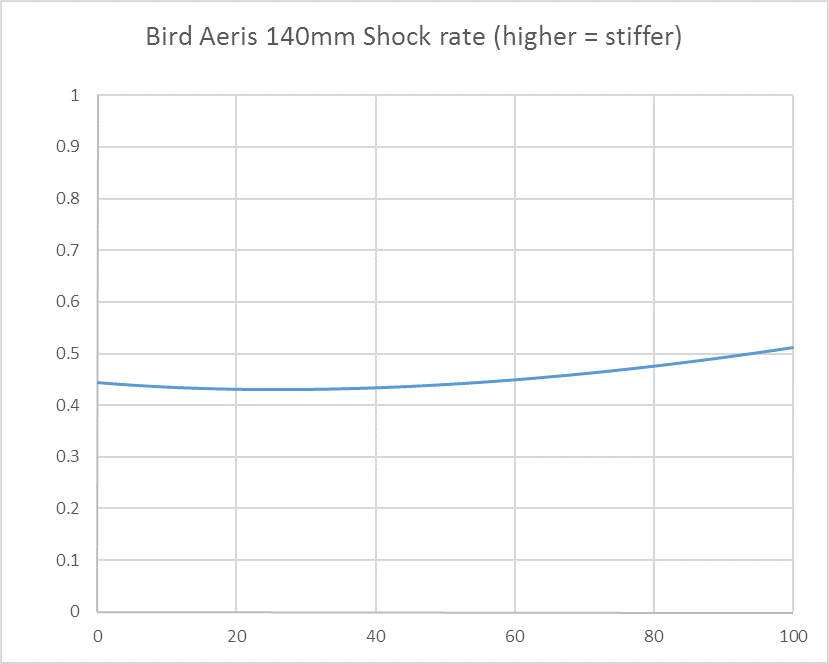
As you’ll see below, Aeris has a regressive-progressive shock curve. The minimum point of the curve is around the sag point (30%), which means that the suspension is most supple and active when sagged. This is not by accident – the curve was carefully crafted and iteratively tweaked in order to achieve this characteristic. After the sag point, the shock curve gently increases up to full travel, which gives support to the rider during G-outs and drops.
Another thing to watch out for is how shock curve data is presented in terms of the scale on the graph. If you can’t see a scale on the Y-axis, then alarm bells should be ringing. I’ll demonstrate this below with the Aeris shock curves.
The three graphs below are all the exact same shock curve, but I changed the Y-axis scale on each. Normally I present shock curves from 0 to roughly the maximum range – this allows me to easily judge the curve at a glance. This is the first curve.
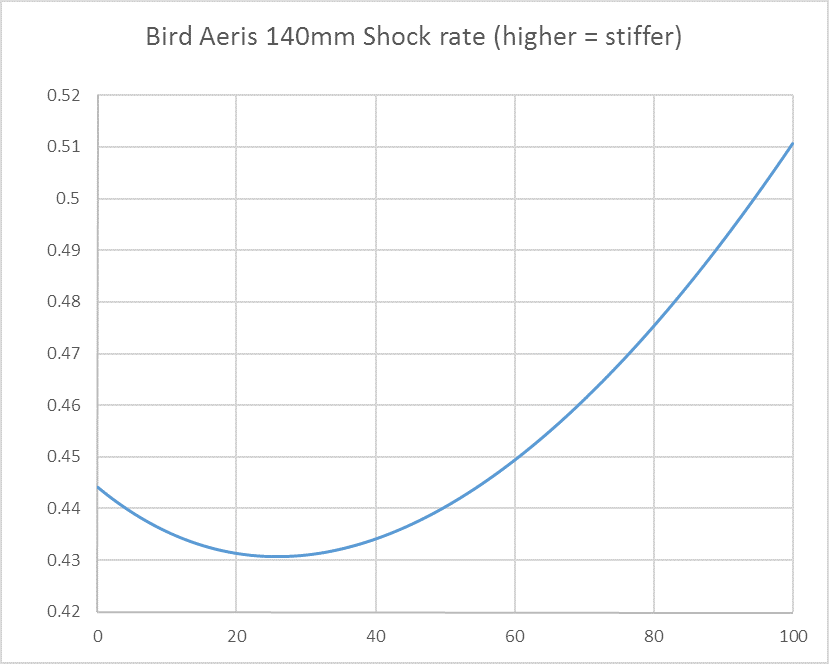
The next curve is zoomed in, so that the Y-axis is based on the maximum and minimum points of the curve. Unless you know where zero is, this can be very misleading. It can make a flat curve look very curved; without a reference point or scale this sort of curve is meaningless.
The last graph shows what you can do if you zoom out on the Y-axis – it flattens curves out. You can see zero, but it’s difficult to see the overall proportions of the shock curve.
Remember, all three of the graphs above are displaying the exact same set of data – only the Y-axis scale has changed. So, beware of the Y-axis scale and look to see if it starts at zero (if it has a scale at all).
Anti-Squat
As mentioned above, I wanted Aeris to pedal really well. I wanted it to pedal well regardless of what shock it is fitted with, and without relying on a pedal platform to cancel out the pedal bob. So I knew that it needed lots of anti-squat built into the frame and linkage. But how much? How do you go about defining a good amount without dialing in too much (too much anti-squat is just as bad as too little – the bike will rise up under power instead of squatting under power, both result in pedal bob)? Well, you ride lots of bikes, analyse them with a kinematics analysis package and see what level of anti-squat feels good to you. Anti-squat isn’t a constant parameter however – it changes depending on what gear you are in and where the rear suspension is in its travel. So we (myself and Ben Pinnick) did exactly that – we rode a bunch of bikes with various suspension configurations, decided which ones we liked how they rode, and then looked at the anti-squat curves to see how riding on the trails correlated with the mathematics. Then we decided on a level of anti-squat that we wanted the Aeris to have, which front chainring size to optimize it for (we decided on 32t), and I set about designing a linkage system to achieve our chosen % of anti-squat. This is an iterative process – when you move pivots around to optimize the anti-squat, this changes the shock curve. After a long time iterating the pivot points we were able to achieve both the shock curves that we wanted as well as the anti-squat characteristics.
I’ll be honest, the anti-squat curve below isn’t that helpful on its own. The % anti-squat depends on the position of the centre of gravity (of the bike and rider together), so larger or smaller riders will experience different anti-squat levels. What it does show is that the anti-squat does vary by about 40% at sag depending if you’re in the smallest or largest gear on your cassette. These curves only really help you when you have ridden the bike and can associate how it rides with the calculated anti-squat values. I’ve separated out the frame anti-squat from the total anti-squat in order to show that total anti-squat is made up of two components – frame anti-squat and chain anti-squat. The total is the sum of these components and governs how resistant the suspension is to acceleration induced compression when pedalling.
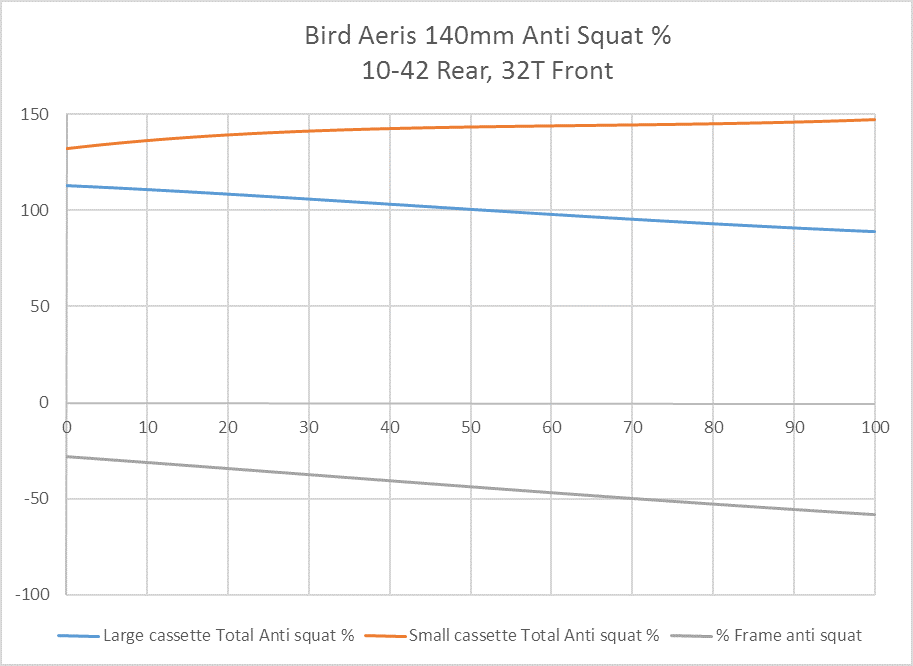
I’ve included the plot below so that you can see how changing your front chainring size can affect the levels of anti-squat. Generally, larger front chainrings equals lower levels of anti-squat from the frame. The reverse is also true – smaller front chainrings increase the levels of anti-squat. Remember that the important thing here is how the bike feels to you as a rider; anti-squat curves are great for comparing two different frames, but not as useful on their own.

Well, that’s it for now; I hope that you found the above either useful or interesting. If there’s anything that I need to clarify or update in this article then please let me know.
Dan Hodge MEng CEng
Engineering Director, Bird Cycleworks
Headset Bearings
It’s that time of year that we get asked about headset bearings…
All Bird bikes use ZS44 / ZS56 headsets. What does this mean? Well, the diameter of the inside of our headtubes is 44mm at the top, and 56mm at the bottom. The ZS part stands for “Zero Stack”. So that’s the headset size sorted.
“But what bearings do I need?” I hear you ask! Well, here’s where it gets slightly more complicated
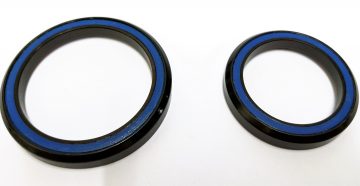
Most of our bikes ship out with our Bird headset, which happens to use the same bearings as a Hope headset. The sizes are below, and can be bought through our website.
- ZS44 36×45 degree 30.2mm ID 41mm OD
- ZS56 45×45 degree 40mm ID 52mm OD
Before 2019 most of our complete bikes shipped with Cane Creek 40 headsets, which use 41mm top bearings (for the 1 1/8″ steerer tube) and 52mm lower bearings (for the 1.5″ tapered steerer tube).

Standard bearings from the Cane Creek 40 are steel, whereas the Cane Creek 110 headset uses stainless steel bearings which are compatible.
Just to be absolutely clear, here are the Cane creek part numbers, type and RRP of replacement headset bearings for your Bird Bike:
| Stock Code | Outer Diameter | Series | RRP |
| CBAA0006K | 52mm (1.5″) | 40 (Steel) | £12.99 |
| CBAA0006S | 52mm (1.5″) | 110 (Stainless) | £32.99 |
| CHSS2030 | 41mm (1″1/8) | 40 (Steel) | £14.99 |
| CHSS2031 | 41mm (1″1/8) | 110 (Stainless) | £39.99 |
You can buy replacement bearings here:
http://www.bird.bike/product/cane-creek-40110-headset-bearings-stainless/